App-Only certificate method
In case that you are planned to use App registration via Azure portal with certificate following is required:
1. Create self-signed certificate. You can use this PowerShell script:
# Create the cert (valid for 2 years)
$cert = New-SelfSignedCertificate `
-Subject "CN=SharePointAppCert" `
-CertStoreLocation "Cert:\CurrentUser\My" `
-KeyExportPolicy Exportable `
-KeySpec Signature `
-KeyLength 2048 `
-HashAlgorithm SHA256 `
-NotAfter (Get-Date).AddYears(2)
# Export public key (.cer) — upload this to Azure Portal
# Replace path to the certificate with own path
Export-Certificate `
-Cert $cert `
-FilePath "C:\Temp\_Certificate\SharePointApp.cer"
# Export private key (.pfx) — use this in your app
# Replace password with your password
$pwd = ConvertTo-SecureString -String "YourPassword123!" -Force -AsPlainText
Export-PfxCertificate `
-Cert $cert `
-FilePath "C:\Temp\_Certificate\SharePointApp.pfx" `
-Password $pwd
# Show thumbprint (you'll need this in code)
Write-Host "Thumbprint: $($cert.Thumbprint)"
2. Upload certificate (.cer, pem or -crt file format) under Certificates & secrets:
3. In ReplaceMagic, when adding SharePoint site use: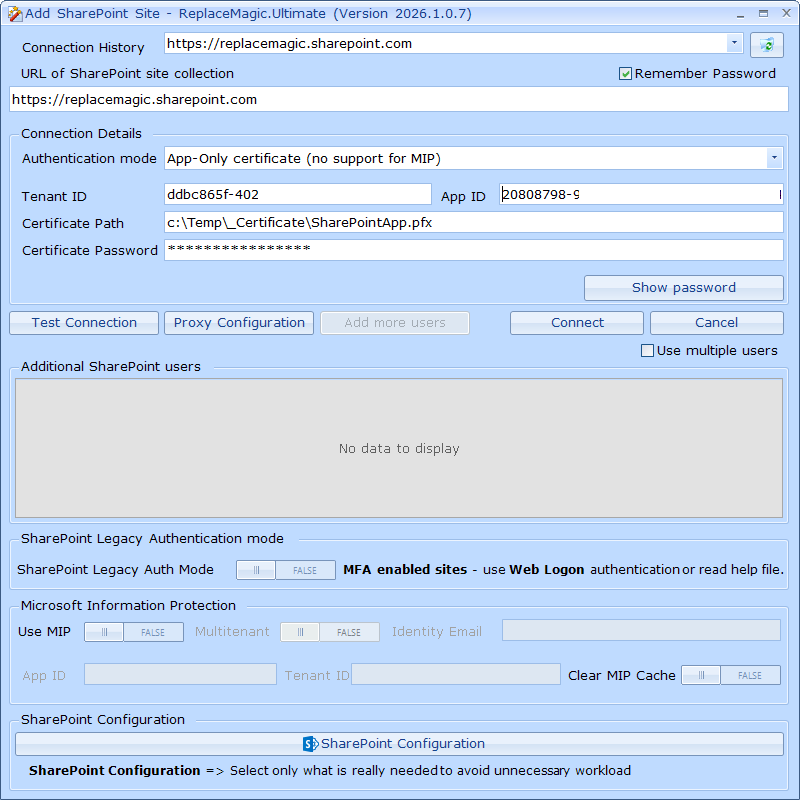
If all is ok, you will be connected to the SharePoint site and can start with document processing.
Remark: Microsoft/Azure Information Protected documents will not work.
Under "Add SharePoint Site", you can clear the MIP cache, which removes the stored authentication token and forces the authentication prompt to appear again.
This option is available only when running the application interactively and cannot be used during a silent run, as it requires user interaction, which would defeat the purpose of an unattended execution.